

How To Install Windows Xp On Usb Flash Drive
For a long time, Microsoft didn't sell Windows install media in the grade of bootable USB flash drives. Instead, it prefered to stick to old-school DVD media, despite the fact that many notebooks today are likewise minor to fifty-fifty include an optical bulldoze, and many DIYers are edifice PCs which forego one on purpose.
However, things have moved on, and for the beginning time, Microsoft has begun to sell Windows 10 on pre-configured USB drives. Previous versions of the OS (XP, 7 and 8.1), all require the user to create their ain bootable USB bulldoze.
Creating a bootable Windows USB drive used to exist a chore, merely today, ane solution tin can pretty-well arrange most people. However, there are times when a flash bulldoze has some quirk that prevents it from working with a particular solution, so for that reason, this article takes a look at five different methods.
Guide Index:
- USB Installer Tools & Successes
- Acquiring a Disc Image (ISO)
- Method 1 – Using Rufus
- Method 2 – UNetbootin
- Method 3 – Using Microsoft diskpart
- Method 4 – Microsoft Windows seven USB/DVD Tool
- Method 5 – Windows 10 Media Creation Tool
- Windows XP Notes
- Common Problems
Benefits of USB Install Media
Even if the target desktop or notebook has an optical drive, there are a couple of reasons to consider first creating a USB-based installer. Admittedly, the time and endeavor of creating the drive might make it best-suited for organisation builders, just for people similar usa, who juggle examination machines, USB is a no-brainer.
To commencement, USB media is more than durable than disc-based media. Discs tin can be easily scratched, while well-built USB flash drives tin generally handle a fleck of abuse. And then, at that place'southward the convenience. Ever walk effectually with a disc in your pocket? It looks a fleck odd.
For us, performance and reliability are the key reasons why we've opted to use USB-based installers in lieu of discs, particularly with USB 3.0 being much more than mutual. Even if a DVD has been burned at the highest commercial speeds, information technology won't exist able to compete with wink retention which offers far improved IOPS operation (operations per second) – it's the same reason why SSDs are much faster for booting an Bone and loading applications than a mechanical difficult drive; the seek times are minuscule in comparison.
While information technology'due south beyond the scope of this commodity, those who truly desire a fast install experience tin slipstream USB 3.0 back up into the install media, which on electric current chipsets and an SSD target tin can allow you to install Windows in under iv minutes flat.
USB Installer Tools & Successes
Over the course of this article, nosotros're going to be looking at v different solutions that accomplish the exact same thing: Creating a USB-based Windows installer; if one doesn't work, the side by side one should (at least, that's the hope). To requite an overview of what to look from each solution, refer to this success tabular array:
| Windows 10 | Windows 8 | Windows vii | Windows XP | |
| Rufus | Yes* | Yes | Yep | Yes |
| UNetbootin | Yes | Yes | Yes | No |
| diskpart | Aye | Yes | Yes | No |
| Microsoft USB Tool | Yes | Yes | Yep | No |
| Media Cosmos Tool | Aye | No | No | No |
| * Requires Rufus ii.1.six or later. | ||||
Given the fact that Windows XP has reached end-of-life status and doesn't officially support installation over USB, we have to outline a number of issues and conditions in order to get it working. Windows XP over USB is still temperamental, and there is a good chance that it just won't piece of work with your system, so delight go on this in listen.
For starters, modern UEFI-equipped machines are non designed to support such an old Bone, then chances are that it will not even install, or even be detected in the first place. If the motherboard in question happens to support a legacy BIOS mode, then it might work. Different version of Rufus (explained later) accept ameliorate luck with the XP process than others. We strongly suggest you skip to the dedicated part of this article that explains the problems with Windows XP and USB back up.
What about Windows Vista? Like Windows seven, viii, and 10, Vista also can be installed from USB media with these same methods, but due to that fact that most take moved on from information technology in favor of ten, it's not a big focus.
We mentioned Rufus above, and that's the tool we're going to atomic number 82 in here with, as we consider it to be the simplest to use, and the most effective. We discussed the aforementioned tool in an article from summer 2012 called 'Creating a Bootable DOS Flash Drive the Easy Way', equally it allows for simple creation of bootable MS-DOS flash drives, every bit the title suggests.
Later the look at Rufus, we'll go on on to UNetbootin, Microsoft'due south diskpart (a tool congenital into Windows), a quick mention of another official Microsoft tool, but ane the company no longer promotes for Windows vii and 8, also as the latest method, the Media Creation Tool. But first…
Acquiring a Disc Epitome (ISO)
Some solutions listed on this page require a Windows disc image (.iso) to be nowadays. The exception is 'diskpart', as the disc'due south files will need to be transferred over manually (it doesn't matter if they come from a mounted ISO or a drive in an bodily DVD-ROM). ISOs are available from a number of sources, simply most people will larn them after purchasing the Os online through Microsoft, or through some other related Microsoft service. If you don't have an ISO, or a disc for that thing, y'all'll need to acquire one from a friend or elsewhere on the web.
If y'all're just looking to downloadWindows 10 every bit an ISO, you lot simply need to run the tool listed in footstep #5, and choose to save as ISO rather than to burn down the image to a flash bulldoze. Annotation that we can't really provide an MD5 for a Windows 10 ISO, as it changes every fourth dimension it's downloaded through Microsoft'southward tool. Only the ISOs straight supplied by Microsoft would accept static hashes.
There are multiple editions of any given Windows version, but we're going to list the verbal ISOs we used along with their MD5 checksums in case they prove useful.
MD5 Checksums
- Windows XP Pro (Service Pack three): F424A52153E6E5ED4C0D44235CF545D5
- Windows vii Ultimate (Service Pack i): 56A26636EC667799F5A7F42F142C772D
- Windows 8 Pro: 0E8F2199FAE18FE510C23426E68F675A
- Windows 8.one (MSDN; multi-version): CDADC5A76634651770A365F457702803
Delight exist careful where you source your Os epitome from, as most online sources will be pirated copies and/or bundled with extra (sometimes malicious) software. How the image was captured every bit well will accept an effect on how the concluding boot drive turns out, so stick to official sources where possible.
For those who have a Windows setup DVD, a free tool like CDBurnerXP or ImgBurn tin be used to rip it into an .iso file. Other tools be that attain the same thing, simply these are the only ones we can personally recommend. For mounting an ISO paradigm, we'd recommend Virtual CloneDrive, as information technology's costless, and not the "gratis just a full nag" kind of free.
NOTE: Some anti-virus applications might interfere with the USB creation process due to the autorun properties involved, and so if issues are experienced, we'd recommend temporarily disabling the anti-virus until the procedure is complete.
Using Rufus
Both Rufus and UNetbootin are simple tools for this task, and exterior of Rufus' Windows XP support, both work just the same. However, we adopt Rufus because we find it loads a lot quicker, and feels a flake faster, likewise. For a great many reasons, this is even so our preferred method of creating USB boot drives.
With Rufus loaded up, choose the appropriate device that y'all want to turn into a boot drive, under the "Device" carte, and make sure that the file organisation is NTFS (not FAT32). The other options shouldn't matter too much, although if you're planning to install Windows 8 as an official EFI Bone, you lot may wish to peruse the options under the "Division scheme and target system blazon" bill of fare. For Windows XP, select MBR Sectionalisation just.
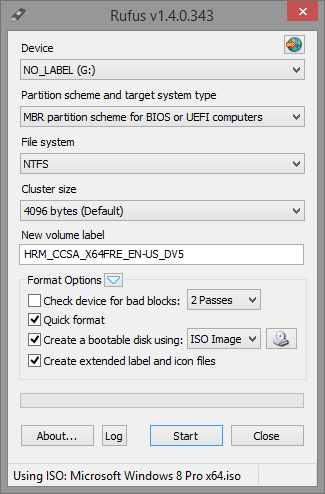
To load the Windows .iso file, the modest CD icon to the right of "Create a bootable disk using:" option can be clicked. Afterwards perusing the file manager for the ISO image and accepting it, the "Start" push tin can exist clicked to have the tool work its magic. Annotation: As the program will state, doing this will erase all data off of the wink drive – so backup first.
If you lot have whatever problems, be sure to cheque out our Mutual Problems section below.
Using UNetbootin
UNetbootin is a well-known tool as it'due south become a de facto choice for turning a bootable Linux live CD into a bootable Linux live flash bulldoze – for that purpose, it still excels. Niggling practise most people realize, it can handle Windows ISOs equally well (only every bit the tabular array at the superlative of this folio shows, it doesn't support creating a bootable Windows XP drive).
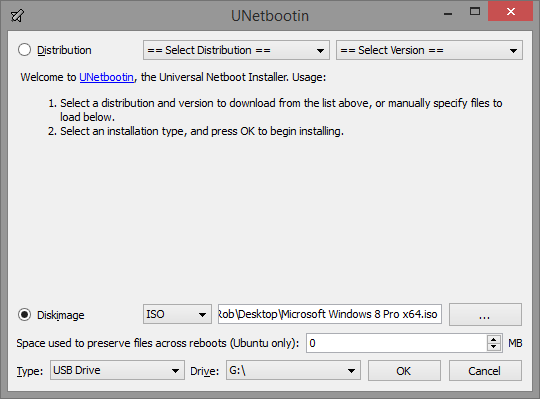
Like with Rufus, the appropriate drive should be selected from the "Drive:" menu at the bottom, and then the "…" button to the right of the largest text field can be clicked to search for and take the required ISO. At this point, the "OK" can be clicked, and the process will get underway.
Unlike Rufus, UNetbootin doesn't erase the flash drive first, then data remains intact – however, if you're repeatedly writing new ISOs to the drive using the tool, it's recommended you lot format later each 1, so equally to not leave unused scrap files effectually the drive. Note: We'd still recommend bankroll up personal information before writing an ISO to it just in example.
Using Microsoft diskpart
For those who don't have an ISO, but rather a DVD, diskpart is the solution for yous. It does require some command-line usage, but as you'll encounter, it's not too complicated. NOTE: This method will delete the entire flash drive, and then exist sure to dorsum up personal information showtime.
To make proper utilise of diskpart, you'll demand to open a command prompt with ambassador rights (head to "Start", type in 'cmd', right-click it, and choose 'Open as Administrator'). Once the prompt is opened, type in 'diskpart' to load the tool, and then 'list disk' to figure out which # relates to your flash drive.
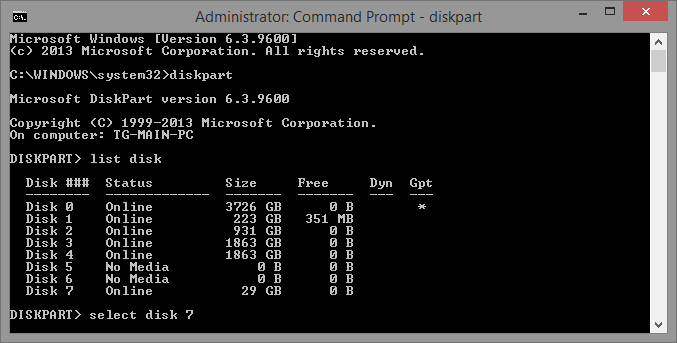
External storage should appear at the terminate of the list, and in our case, it did (nosotros're using a 32GB flash drive, which appears here as 29GB). One time the appropriate drive is figured-out, information technology can exist chosen using the 'select disk #' command. One time selected, it needs to be wiped clean, take a division created, and and then be formatted. The entire command process is summed-upwardly in this block:
list disk – shows avaialble disks, wait carefully for the one that looks like your wink bulldoze
select disk # – change # to the disk (flash bulldoze) you lot wish to use
clean – removes existing partions
create partition primary
select division ane
active
format fs=ntfs quick
assign
go out
For those who might want to see this in activity, we provide this screenshot:
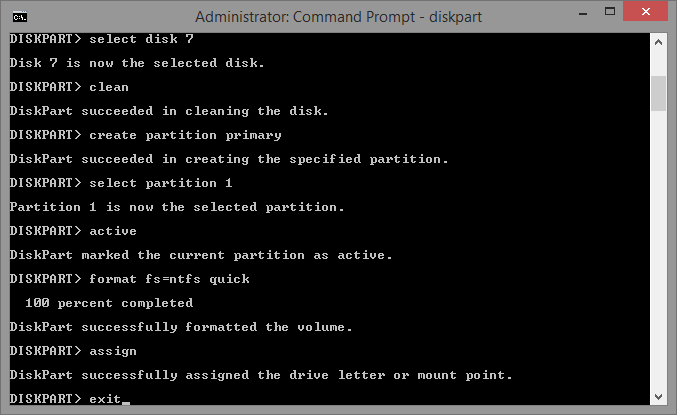
Notation that "quick" can be removed off of the format control to run a total format, but that might take minutes to tens of minutes depending on the drive (as it's more thorough).

At this point, the Windows setup DVD can exist inserted into the bulldoze, or the ISO mounted, and its files copied over to the root folder of the flash drive. Afterwards the process is done, opening upwardly the flash drive in the file manager should mirror the contents of the Windows DVD/ISO.
Using Microsoft Windows 7 USB/DVD Tool
After the Windows 7 launch, Microsoft released its own USB creator tool that supported its official ISOs. While the visitor no longer promotes the tool, it supports at to the lowest degree 7 and eight just fine, so some might prefer to use information technology over the other solutions.
Once downloaded and opened, an ISO must be called. After that, the "USB Device" choice needs to be clicked (this same tool can as well burn straight to a DVD).
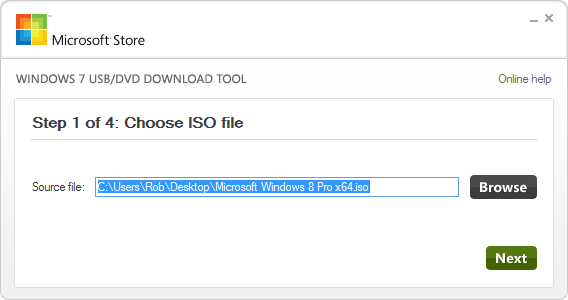
At the last screen, the appropriate wink dive needs to be selected from the menu, and later striking "Brainstorm copying", the entire process will exist complete after only a couple of minutes.
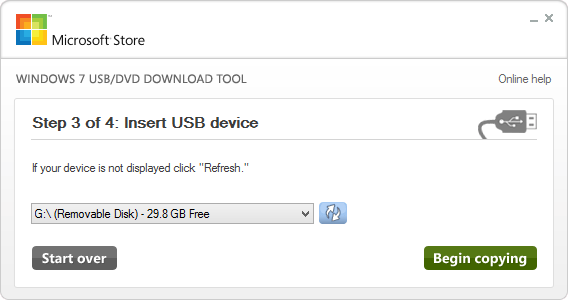
Truthfully, Microsoft's tool here might be the easiest of them all to utilize, only considering the company isn't promoting it in any way, shape, or form (note that it's called the Windows 7 USB/DVD tool, and not Windows seven & 8 USB/DVD tool), we feel that it'south right to quicker recommend the other (oft updated) solutions starting time.
Using Windows ten Media Cosmos Tool
If you plan to install Windows 10 on a new system, utilize it to recover an existing system, or upgrade a previous install of Windows 7 or 8, creating a bootable flash drive is the starting time step. Windows 10 is the offset Microsoft Os that non merely natively supports USB installs, just encourages information technology and fifty-fifty sells USB drives ready-to-go.
The process with Windows x is not much dissimilar from Windows 7 and 8/8.ane similar above, just is made simpler by the fact that y'all don't even need the disk prototype first, as y'all can download it straight from Microsoft, consummate with all the latest service packs already installed.
The whole procedure for creating a Windows x bootable USB drive can be washed by using the Media Creation Tool; virtually systems these days will use the 64-scrap version, and then grab that.
Once you've downloaded the tool, run information technology and you'll be presented with the media creation process. The gallery below outlines each footstep of the procedure for the basic method. There are a few things you might need to cheque first. Depending on where yous plan to install Windows x, you demand to cheque which version you require, Abode or Pro. NOTE: The contents of the USB flash drive will be erased, so brand sure you lot back it up first.

Select 'Create installation media for some other PC' to begin the procedure.
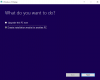

We'll be creating the bootable USB flash drive with the tool, so select the first option.
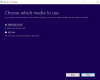
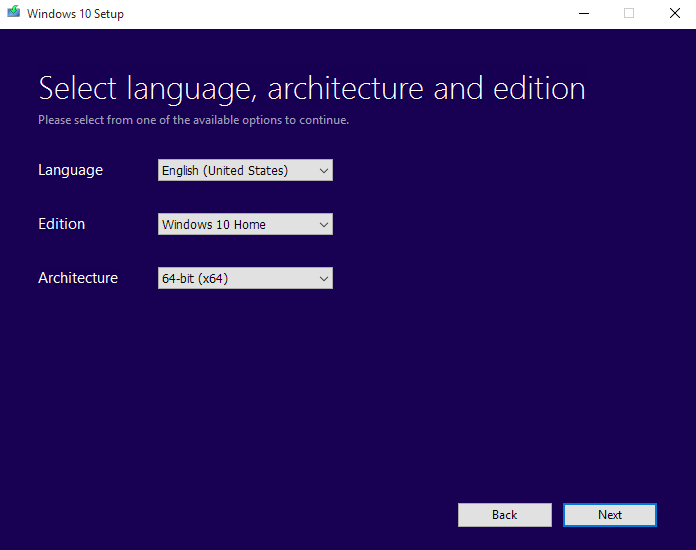
Select the version of Windows 10 that you require, in this case, we went with Dwelling 64-scrap.

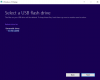
Choose the USB drive that y'all wish to turn into the bootable media. Only Wink media will show on the listing. The drive will need at least 4GB of gratis space. Notation: The wink bulldoze will be formatted, then make backups offset.

Look for the tool to finish downloading. Depending on your Internet connection, this could be from a few minutes to a few hours.

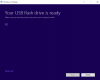
Once the Windows 10 image has downloaded, it will automatically begin creating the boot media on the drive y'all selected. This tin take a few minutes.
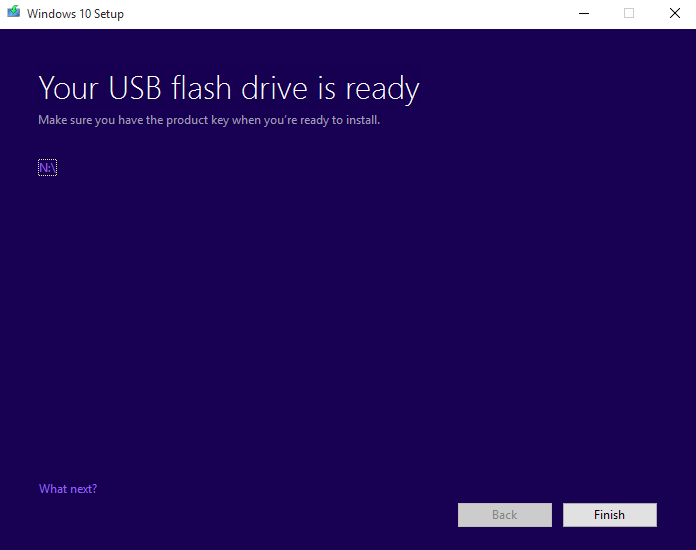
If everything when according to plan, the Media Creation Tool will declare success and you are ready to employ your new Windows 10 bootable USB bulldoze.
The version you selection here at the commencement really doesn't matter, since your license key volition determine the version you tin use, and the Os will change and configure itself based on that cardinal. The N version of each Os type is for the Eu compliant version, only truth be told, there isn't anything unlike about it at this time. You tin selection 64-bit besides, or both 32/64-bit if you are unsure or program on using the bootable flash bulldoze on unlike systems.
The Media Cosmos Tool can can be used to merely download the ISO epitome of Windows 10, which can then exist used with something similar Rufus to create the bootable USB bulldoze. This offers the advantage of being able to keep a backup of the ISO paradigm, also as create multiple kicking drives without having to download the image each time. If you run into problems with the Media Creation Tool when it comes to creating the bootable flash drive, you can employ the following method.
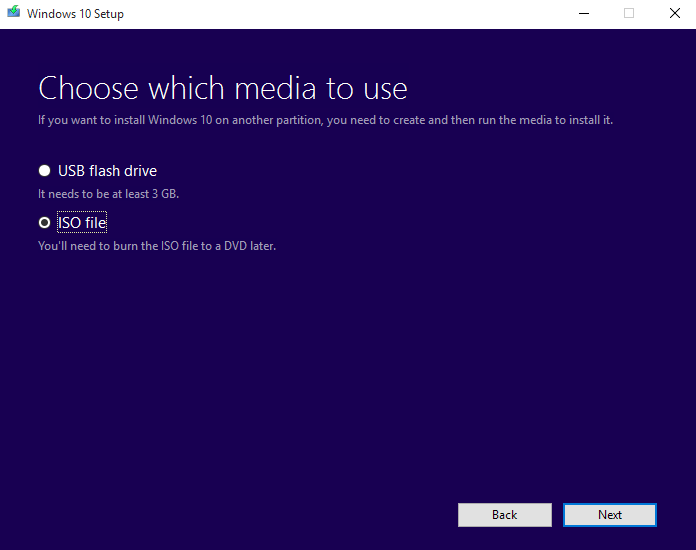
Instead of selecting USB Wink Drive in the Media Creation Tool, merely select ISO File instead, choose a location to save the file, and after information technology's downloaded, follow the steps outlined in the Rufus guide in a higher place. In general, we found this method more than reliable than using the Media Creation Tool to create the Windows 10 bootable flash drive, and ther are a number of other advantages to using Rufus also.
NOTE: When you let the Media Creation Tool handle the entire process of making the USB boot drive, there is a small trouble when dealing with USB drives larger than 32GB. The tool will merely create a single partition up to 32GB and and then completely ignore the rest of the drive, and Windows-based operating systems can just handle a single partition on USB flash drives. If you create the boot bulldoze with Rufus, it'll apply the entire drive, so 64GB and 128GB flash drives will have the full disk space made available.
Windows XP Notes
If you are attempting to employ Windows XP on a USB bulldoze, in that location are a couple of things to comport in mind. Commencement off, we strongly recommend using Rufus (32-scrap version) to setup XP on a USB flash drive over the other methods, equally its success rate is much amend. If installing with Rufus doesn't work the first time, alter the partition mode to MBR for BIOS just. Making XP kick over USB is a little tricky likewise, because it'south much more sensitive to the historic period of the hardware and the system you are using it with.
Every bit far every bit we know, the 32-bit ISO epitome of XP is the simply compatible version that tin can be put on a bootable flash bulldoze (success for XP 64-bit was limited). One of the key points though is that yous tin't employ a USB 3.0 port when installing, fifty-fifty with EHCI mode enabled. Nosotros also found that a lot of modern hardware refuses to notice the drive.
If you are using an older system, then yous should have amend luck booting Windows XP from a USB flash drive. Just exist sure that your particular motherboard supports booting from USB in the first place (it'south normally off by default in older system). Check the BIOS kicking department and run across if USB drives are supported.
Unfortunately, the time catamenia in which motherboards supported USB booting on older hardware is quite short, as annihilation earlier didn't have the option, and anything after (around the fourth dimension Windows Vista and vii took off), those boards started the transition over to UEFI, which XP does non support.
A number of systems we have tested this with had very mixed results. Both an older Pentium D organisation with BIOS, and a i7-2600 with UEFI, couldn't boot into XP. The USB media does work on a couple of laptops, but with other systems, it just boots up into a blank screen. If checking your motherboard settings for USB boot support and fifty-fifty legacy modes do non work, then you will have to resort to using a CD/DVD. You can read beneath for some more full general advice also.
Common Problems
No Bootable Device Detected
This tin be acquired by a number of things. The most common is that your system is not setup to detect or kick from USB devices. You will need to go into your BIOS/EFI and check whether your USB drive is detected at all. If it is, make sure that information technology's bachelor from the boot carte. If it isn't, so some security option may be enabled that prevents booting from USB devices.
Every bit each BIOS/EFI is different, we can non help with specific options, just check various security and boot menus to make certain that USB support is enabled. If everything appears right, just even so can't exist detected, endeavour enabling USB legacy support, or a unlike USB port, such as a USB two.0 port instead of USB 3.0.
Information technology's besides possible that the install media, or ISO paradigm you have, does non have the boot information available. Endeavor a dissimilar ISO image if at all possible.
Windows Installer Starts But Can't Detect Install Media
If the installer starts and lets you selection installation options, but an error occurs that either says it can't detect the DVD or it requests you to insert media with additional drivers, and so you demand to use a USB 2.0 port.
Windows XP, Vista and 7, do not accept native support for USB three.0 ports. Attempting to install with your flash drive plugged into a USB 3.0 port will result in the above error. Unplug your USB Flash Drive and insert it into a USB 2.0 port, then begin the procedure again. You may still use a USB 3.0 Flash drive, only not plugged into a USB iii.0 port.
If no USB 2.0 ports are bachelor (such as with more modern systems), then you volition either demand to become into the BIOS/EFI and enable forced legacy mode or enable EHCI on the USB ports, or you lot volition demand to 'slipstream' the USB 3.0 drivers into your Windows Install Epitome.
Wink Drive Isn't Using All Available Infinite
This was mentioned previously in the Windows 10 section, merely if y'all are creating a USB boot drive for Windows 10 and your 64GB drive is only showing 32GB bachelor, then yous need to recreate your boot drive with Rufus. The Media Cosmos Tool (MCT) only supports drives upward to 32GB, and anything larger volition have a 2nd partitioning fabricated, which Windows can non observe normally (merely is still available if you plug it into a Linux automobile for case). So download the ISO with MCT, then wink it with Rufus.
Windows ten 'Something Happened'
Generic and oh-and so-helpful error. If you are using the Media Creation Tool to create the bootable USB wink bulldoze, and it's declining on the final footstep, try the culling (and recommended) method of using the tool to download the ISO image and then use Rufus to create the boot media. If the Media Creation Tool is failing to download the ISO, then this is likely a network issue with either your local machine or Microsoft'southward server. Try using a wired/Ethernet connexion instead of wireless, or just look a while and try once more later. Failing that, try to download from a different auto if possible.
If you accept any questions about whatever of the steps, delight leave a comment below and we'll assistance you equally best nosotros tin can.
Update: This commodity was updated May 2018 by Jamie Fletcher, to include Windows 10 and additional information regarding XP and USB size issues. Originally published December 2013.
Support our efforts! With ad revenue at an all-time low for written websites, we're relying more than always on reader support to help us continue putting then much effort into this type of content. Y'all can support us by becoming a Patron, or by using our Amazon shopping affiliate links listed through our articles. Thanks for your support!
Source: https://techgage.com/article/creating-bootable-windows-xp-7-8-flash-drive-installers/
Posted by: alexanderhaverm.blogspot.com
0 Response to "How To Install Windows Xp On Usb Flash Drive"
Post a Comment